Teabag Nail Repair Trick - Nail Care
Hello! A few weeks ago one of my nails split done the smile line and I didn't want to cut all my other nails really short to match. Therefore I searched the internet in the hope of a solution and came across this method!
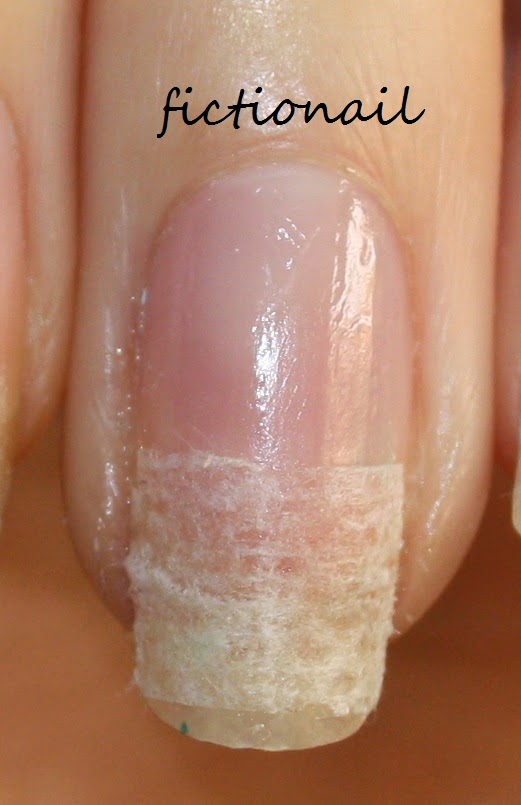
Below are photos of my nail before and during the process of applying the teabag! The split shown is after a couple of weeks of using the tea bad method so it has grown out quite considerably!

If you're prone to weak nails you could also wrap your whole nails with the teabag to prevent splitting and to strengthen them!
Also if you're against the misuse of teabags, one teabag will cover all of your nails several times and you only need a tiny section of it at a time, so it's a really cheap solution!

There are many variations of how to do this but this is what has worked for me!
What you need:
1. Teabag (obviously!)
2. Base coat, or a clear nail varnish
3. Scissors
4. A nail file
One of my favourite things about this technique is that you don't need anything that you probably already have in your house!
Method:
1. Cut the teabag and empty it, wash and completely dry your hands
2. Cut a small section of the teabag, you don't need it so it covers the whole nail, but just the area with the crack or tear, but it doesn't matter as long as the weak area is completely covered
3. Apply your basecoat, whilst it is still wet apply the small section of teabag firmly but gently onto the nail
4. Press down gently with your fingers so it's all smooth and to remove any bubbles
5. Apply another layer of basecoat and add another layer of teabag if you want, I used 2 different sized pieces on my nail
6.Gently file the nail to remove any excess teabag and to create a smooth surface on your nail
7. Add a final coat of basecoat and leave to dry, and then paint nails as normal!
My nails with the teabag technique!

Depending on how often you change your nail colour this wrap could last quite a while, I left my colour on for 5 days and when I removed it the teabag was still intact! However it is easily removable with nail varnish remover!
I was so glad I found this solution! I have no idea how my nail split, I just looked down at it and saw the tear and had such a panic over it! Thankfully this method has at least given me a temporary solution while it grows out a little more to make it less painful when it does inevitably break off!
I hope this has given you some help into fixing a broken nail, let me know if you have any questions!
Thank you for reading!


Comments
Post a Comment